Blogger Backgrounds

Wednesday, January 18, 2012

Strawberries & Cake & Crumbles... All in one retro recipe!!

I absolutely love strawberries.  They're always on hand and I always have them as a snack or add them somehow to a meal or dessert whenever I can.  My cousins came over for a dinner the other day and I needed a quick dessert and one that I had most (if not all) of the ingredients on for.  When I found this I was really excited because I not only had all the ingredients on hand, but I was able to make a strawberry dessert!  Who knew retro recipes would be this easy??

This recipe came from the early 1950s and is a Strawberry Coffee Cake.  I served it as a cake, but it can also be served as a bar and cut into pieces to be eaten by hand - I sent some pieces with Mike in his lunch for work to be eaten by hand the few days after I made it.  This recipe kind of reminds me of a crumb cake because it has a bottom layer of cake, then the strawberries, and then crumbs made of butter, flour, and sugar on top.  It's really good and hits the spot!


STRAWBERRY COFFEE CAKE
*  2 cups sifted flour
*  2 tsp baking powder
*  6 tbs sugar
*  3/4 tsp salt
*  1/3 cup shortening
*  1 egg, beaten
*  1/3 cup milk
*  1 1/2 cups strawberries, cleaned, and cut into quarters
*  3 tbs butter
*  1/4 cup sugar
*  3 tbs sifted flour

Bake in a greased 10x6 in. pan at 400 degrees F.

Sift first four ingredients together. 


Cut in shortening with two knives or pastry blender.  Combine egg and milk and add all at once to dry ingredients. 


Blend thoroughly. 


Spread dough in greased cake pan and arrange strawberries on top. 


Combine remaining ingredients and mix together with a fork (or crumble by hand) until a crumbly consistency.  Sprinkle over strawberries. 


Bake in hot oven (400 F) about 25-30 minutes. 


Serve and enjoy!


ORIGINAL RECIPE:

Tuesday, January 17, 2012

Baby it's cold outside... So, let's make some soup!

My car has had a snowflake next to the outside temperature at some point every day for the past few weeks.  The snowflake comes on whenever the temperature goes below 40 or to warn that there could be some chance of there being winter conditions on the road.  Needless to say, it's been cold here in the Garden State (although no snow so I won't complain too much!) and all I want to do is stay inside and be as toasty as I can.  Last week I figured a good way to help me do that would be a good, savory, hearty soup.  It definitely worked and was delicious too!

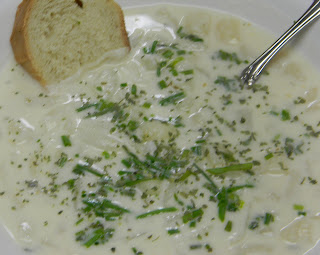
When people think retro recipes, soups don't usually come into mind, but this Sour Cream Potato Soup came straight from a book from the early 1950s that was only soups.  This one stuck out because it sounded pretty tasty but also was surprisingly easy to substitute for items that were lower in fat.  Also I added chives (one of my favorite flavors) to the soup itself and also as a garnish, which really made this burst with flavor.  Oh, and another added bonus - it's really easy to make too!


SOUR CREAM POTATO SOUP
*  2 cups diced potatoes (I used 2 cups worth of diced canned potatos to save on time)
*  1 cup boiling water
*  1 tsp salt
*  1 small onion, sliced
*  1/2 tsp pepper
*  2 cups sour cream (regular, low fat, or fat free will all work depending on your needs)
*  1 cup chopped chives
*  Minced parsley

Makes 6 servings.

Combine first five ingredients and cook together for 15 minutes. 


Add cream and 1/2 cup chives; cook until potatoes are tender. 


Serve hot. 


Garnish with parlsey and remaining chives. 


Serve with slices of bread (French bread would be best, but all will work) to take this recipe to an even higher level.  Enjoy and stay warm!!


ORIGINAL RECIPE:

Tuesday, January 10, 2012

Rapid Retro Apps

Hello 2012, it's very nice to meet you!  This year is definitely going to be a little different from the other ones... For one thing, Mike and I will be moving into our new home in a few weeks!  We haveb een waiting for this for a while and couldn't be happier and more excited.  Another thing that is different is my new job.  I started last week as a teacher's aide for Special Ed in one of the local school districts at an elementary school.  My coworkers have been so helpful and friendly and the kids are really sweet.  2012 is off to a great start so far!  Very thankful for that!  :)

Our New Year's Eve was a pretty laid back and quiet one with good friends. We dressed up, toasted, and had plenty of goodies. Here is a picture of me and Mike from that night about 5 minutes before the ball dropped.


My friend and I did the cooking and one of the things I made was a platter of retro appetizers.  These apps are pretty cool to look at and are really quick and easy.  These will definitely take you back in time faster than any DeLorean ever could!

These appetizers all come from the same cookbook which was from the 1950s. 


I chose five appetizers from this book.  They are:

Pineapple Spears:  These look adorable and are a super simple way to mix sweet and salty.  I added an extra step and mixed coconut cooking spray with brown sugar in a pan, then added the pineapples and cherries. I tossed them around for about 2 minutes just to mix the flavors.  I found the coconut cooking spray at Fresh Market and it definitely adds a hint of coconut to the food.  Regular cooking spray will work for this too though.  Here is a picture of the spray I used if you are a big coconut fan like I am.


The pinapple at the bottom kind of remind me of a hula skirt and these would especially make a great addition to a luau or tiki party.  On the other hand, these are great any time of year when you want to add a little bit of the tropics to the night.

Bacon Rolls:  Ridiculously easy and quick to make.  I used the fully cooked bacon that you can buy in the super market.  Just make sure to pay attention to them in the broiler...  3-5 minutes tops!  


If you look at the original recipe you can see there are other variations to make - these were pretty tasty.

Ham Sticks:  Another easy and quick one.  These can be made ahead of time, but just be sure to cover them in foil and put them straight into the fridge.  To save on space, you can cut them in half.  Or stack them into a pyramid whole on a rectangle plate. 

Burning Bush:  Definitely make this ahead of time and put it in the fridge so it can chill at least an hour before serving.  I was nervous about finding dried beef when I first saw this recipe.  However, I found out that Hormel makes one that is usually found by the tuna and other canned meats. 


I used a pomegranite for the base instead of a grapefruit.  Any larger fruit will work depending on what you have on hand or the look you are going for.

Green Chive Balls:  Like the recipe above, this recipe can be made ahead of time should definitely chill for at least a hour until immediately before serving.  The original recipe calls for an egg yolk, but it would have to be served raw.  To hold the recipe together I used sour cream instead.  I also substituted prosciutto for the ham to add a little more flavor.  The chives were a perfect finish to this app.

I served the last two together  on toothpicks stuck into the pomegranite to add some color and variation. 

PINEAPPLE SPEARS
*  Coconut cooking spray or regular cooking spray
*  1 can of pineapple chunks, drained
*  1 jar of marascino cherries
*  1 tsp brown sugar (light or dark)
*  25-30 cubes of sharp cheddar cheese

25-30 toothpicks.  Makes approximately 25-30 spears.


BACON ROLLS
*  25-30 pieces of bacon/fully cooked bacon
*  25-30 small cubes of cheddar cheese

Cookie sheet lined with parchment paper, lightly greased.  Broiler set on high.  Makes 25-30 rolls.


HAM STICKS
*  1 package breadsticks
*  1/2 pound ham, thinly sliced
*  1/2 cup mustard (spicy mustard also works)
*  Paprika

Makes approximately 20-24 sticks.


BURNING BUSH
*  3 oz cream cheese, softened
*  1/2 tsp minced onion
*  1 cup minced dried beef

8-12 toothpicks.  Makes approximately 8-12 balls.


GREEN CHIVE BALLS
1/2 cup grated Swiss cheese (Cheddar will also work)
*  1/2 cup minced ham/prosciutto
*  1/2 tsp mustard/spicy mustard
*  1/2 cup sour cream
*  1/4 tsp salt
*  Dash pepper
*  1 cup minced chives

8-12 toothpicks.  Makes 8-12 balls.


PINEAPPLE SPEARS:  Drain pineapple and cherries.


Spray pan with cooking spray and mix with brown sugar on medium heat. 


Melt sugar. 


Add fruit and stir over heat for about two minutes. 


Remove from heat and cool.  Spear a cherry, then a cube of cheese, and then a pineapple cube on the bottom.  Stand with pineapple as the base.  Serve.


___________________________________________________________________________________

BACON ROLLS: Roll cube a strip of bacon.  Hold together with tooth pick.  Line on cookie sheet and put in high broiler until bacon crisps.  Serve.

***BACON THAT IS ALREADY FULLY COOKED WILL CRISP UP IN NO MORE THAN 3-5 MINUTES.  KEEP AN EYE ON IT!***


___________________________________________________________________________________


HAM STICKS:  Lay a piece of the ham on a piece of tin foil. 


Spread ham with mustard. 


Lightly sprinkle a thin dusting of paprika. 


Wrap around bread stick allowing 1 inch of each end to be free as a handle.  Repeat with remaining breadsticks.  Serve immediately or chill until served.


___________________________________________________________________________________


BURNING BUSH:  Mince beef if not done already. 


Mix cream cheese and onion together. 


Form into balls and then roll in beef.  Put on toothpick and poke toothpick into fruit for display.  Repeat until finished.  Chill for at least one hour before serving.


___________________________________________________________________________________


GREEN CHIVE BALLS:  Mix together all ingredients except the chives. 


Form into balls and then roll in the chives.  Put on toothpick and poke toothpick into fruit for display. Repeat until finished. Chill for at least one hour before serving.


HERE IS THE DISPLAY OF THE LAST TWO RECIPES:


Here are the original recipes.  Happy entertaining! 


Friday, December 30, 2011

You're a mean (sweet "cookie") one... Mr. Grinch!

I have always loved the Christmas season. I love it so much that when my husband and I got married, it was a Christmas themed wedding.  I absolutely loved it - we had Christmas themed invitations with a bride and groom, we had wreaths sent in from Maine for centerpieces, the church was decorated with pointsettas and a nativity, the bridesmaids looked great in red halter dresses with rhinestones, and I had a faux fur white coat to go over my dress in between the ceremony and reception (it was absolutely freezing that day and I had a strapless dress.).

In addition to our anniversary, my birthday and Mike's birthday are also in December.  So, I guess you could say this is probably the busiest, but definitely one of the most celebrated, festive, and exciting time of year for us.  I know the Christmas season doesn't techinically end until January 6, but slowly but surely things are calming down (although the traffic for the malls hasn't - thats definitely something I could do without!) and a new year will be here in less than two days. 

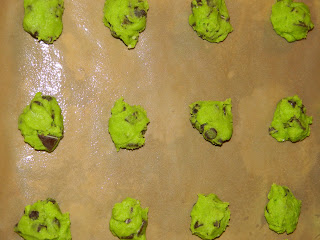
So for those of you who want to hang on to some holiday cheer just a little longer, here are some Grinch cookies I made a few weeks ago.  I had a Grinch party with two of my nieces and baked these cookies for them while we watched How the Grinch Stole Christmas.  The recipe actually came from Pinterest (and I think ultimately from a Betty Crocker recipe), and although it's not a retro recipe, these cookies are honestly so ridiculously easy to make, look great, and taste amazing.  Everyone from my nieces, my husband, my sister and brother-in-law, and my parents were fighting over who got to eat the last ones.  Also, the Grinch is a retro movie, so I guess it still counts.  :)


Anyway, now the Grinch cookie recipe.  I found this recipe on Pinterest, if you look under my new and exciting recipes board you'll find the link to where I got the recipe from.  I followed the recipe exactly except for the very end - it called for 8-10 minutes in the oven.  I found that 10-12 would be better.

GRINCH COOKIES
1 pouch (1lb 15oz) Betty Crocker sugar cookie mix
*  1/2 cup butter or margarine, softened
*  1/4 - 1/2 mint  tsp extract
*  8 drops food coloring (you can add a bit more if you want a really green cookie)
*  1 egg
*  1 cup semi-sweet chocolate chunks
*  1 cup creme de menth baking chips (I found it impossible to find actual chips, so I got Andes Creme de Menthe Thins and made them into chips myself.)


Makes approximately 34-38 cookies.  Line a cookie sheet with parchment paper and lightly grease.  Set oven to 350 F.

Break the Andes chocolates into little chips and until you have a cup worth.


In large mixing bowl stir cookie mix, butter, extract, food coloring, and egg until a soft dough forms.


Stir in Andes chocolates and semi-sweet chocolate chunks. 


Using a small cookie scoop or a teaspoon, drop dough 2 inches apart on cookie sheet.


Bake 10-12 minutes or until set.  Cool 3 minutes and move to wire rack.


Serve warm (they're extra delicious that way) or cool completely (still pretty delicious!).  Store tightly covered at room temperature.  Enjoy!!